
In order to have your computer running always at the optimal performance, you will have to adopt a habit to periodically run Windows PC maintenance tasks. These tasks are usually part of a bigger preventive maintenance plan that will ensure your Windows PC will run smoothly and keep the user experience on a high level. Besides that, caring for your Windows PC the right way can pretty much ensure your device will live longer which will save you more money in the long run.
Windows PC maintenance tasks can generally be divided in two major categories:
- Windows OS maintenance tasks
- Hardware maintenance tasks
As a former IT Support specialist with more than 13 years of professional experience in the field, I was able to nail down all details and put everything I know in this detailed guide.
The first part is about Windows OS maintenance tasks.
Windows OS maintenance tasks
Update Windows OS Regularly
Updating the Windows Operating System (OS) is one of the most essential maintenance tasks for Windows PC.
Before Windows 10, users were able to disable Windows updates, thus exposing their PC at risk.
Starting with Windows 10, it is pretty hard to stop Windows updates rolling on.
Although this is arguable, I acknowledge this because regular updates bring not only new features, but also security patches, improvement and stability of the Windows OS.
If you are Windows 10 user, from the Start menu type “Check for updates” and open the Settings window:
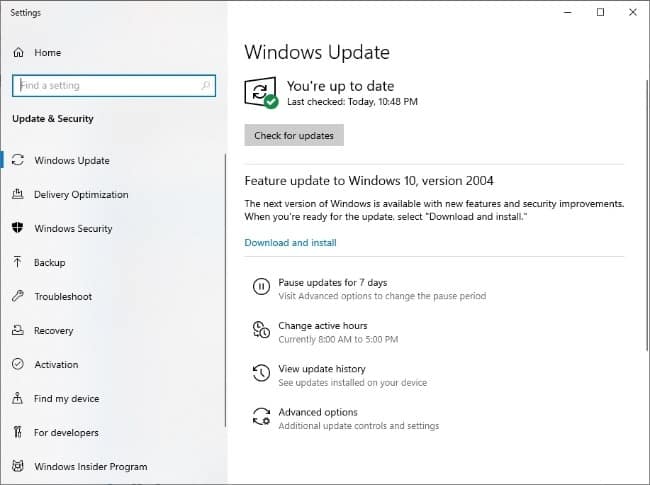
If your computer has not been updated recently, initiate the Windows updates by clicking the “Check for updates” button.
Update Installed Programs
All programs i.e. software that is installed requires maintenance from time to time. Some of the software vendors push updates automatically in the background, so the end-user (You) will need just to re-launch the program or restart the computer in order to apply the updates. Take for example Internet browsers Chrome or Mozilla, or Adobe’s PDF Reader. They have auto-update functionality turned on by default. They prompt the user after each update to apply the updates either by relaunching the program or restarting the computer.
However some of the vendors do not provide functionality for automatic updates to their applications, therefore you will need to manually check for updates.
Checking for updates, as an option is usually placed under the Help or About menu from within the Application interface.A time-saver for this procedure could be some third-party applications that can check for updates for all applications at once. A great example of such an application is Ninite .
.
Perform Regular Antivirus and Antimalware Scans
Having a solid antivirus and antimalware application installed on your computer is of the utmost importance for the health status of your PC.
You don’t necessarily need a paid solution right in the beginning, although it is good to have one.
There are free versions of antivirus programs that work very well along with the preinstalled Windows Defender.
Although there are sayings that Windows Defender has been improved a lot over the time, I wouldn’t rely only on it. In general, Microsoft is not yet good at fighting viruses and malware.
Having a proven antivirus and antimalware application is something you should strongly consider.
Sophos, Bitdefender and Kaspersky are some of the antivirus programs that also offer free versions.
However, it is worth investing in a paid antivirus solution because you will be fully protected and not just having a basic protection, which in essence is what free antivirus programs do.
A great example of a paid antivirus solution is Sophos Home Premium. Read the full review here what are the key points that make this antivirus an excellent choice for protecting the entire family.
Update BIOS, Drivers and Firmware
Regular updates of Drivers and Firmware bring additional stability of the Windows OS.
Vendors periodically release new versions of the drivers and firmware, thus improving the functionality of the underlying hardware through these updates.
Big vendors like Dell, Lenovo or HP provide specialized software pre-installed in the Windows OS. For example, Lenovo has “Lenovo System Update” and Dell has “Dell Update”, etc.
Nonetheless, Windows 10 has a great update repository and can pull most of these updates through the Windows updates functionality, but I would prefer using the above mentioned utilities.
Check the disk for errors
Although checking the disk for possible errors and bad sectors happens within the Automatic Maintenance, it could be useful sometimes to be run on demand.
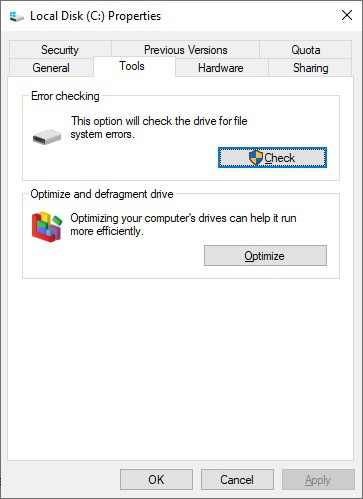
In order to check any particular disk for errors, you will need to right-click on the drive you wish to check, then click Properties and go to Tools tab. Then, under the Error Checking section, you should click the Check button.
Perhaps you will be prompted that you don’t need to scan that drive. Nonetheless, go ahead and check the drive by clicking the “Scan drive” option.

Optimize and defragment drive
Although the process of optimizing and defragmenting the drives runs automatically in the background, there might be some cases that you will need to run disk optimization especially if your Windows OS is installed on a SATA hard drive.
The new SSD drives usually do not have issues with fragmentation, but older hard drive types do have this problem after a certain period of time.
You need to ensure that all data that is stored on the hard drive is organized the right way, so it will be easily accessible and a bit faster. Right-click on the drive you wish to check, then click Properties and go to Tools tab. Then, under the Optimize and defragment drive section you should click the Optimize button.
On the next Window, review the settings and click Optimize.
Cleanup the disk & Delete Unnecessary Files and Programs
Over the time a lot of junk and temporary files are being stored on the hard drive, which might take a lot of space if they are not being deleted periodically.
These unnecessary files might be: Windows Update clean-up files, Temporary Internet Files, various logs generated by Windows OS, Downloads folder, Temporary Files, Recycle Bin, etc.
All these files can take up to several gigabytes, which is not small especially if you struggle with disk space.
Another fact is that these unnecessary files could slow down your computer in a certain way.
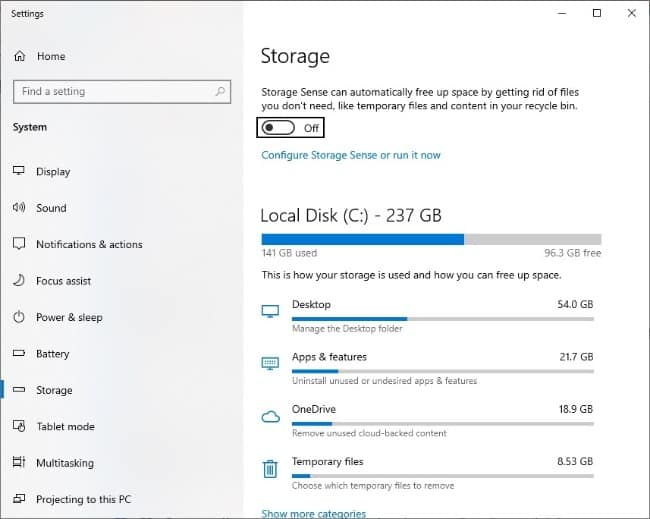
If you are a Windows 10 user, then you can take the opportunity to utilize one new Windows feature that didn’t exist in earlier versions – Storage Sense.
Storage Sense can automatically free up space by getting rid of files you don’t need, like temporary files and content in your recycle bin.
It is way better and supersedes the classic Disk Cleanup tool (cleanmgr.exe).
From the start menu type “Storage settings” and press Enter.
Click Configure Storage Sense or run it now , on the next window review the settings and click the Clean now button located in the bottom.
Check Automatic Maintenance
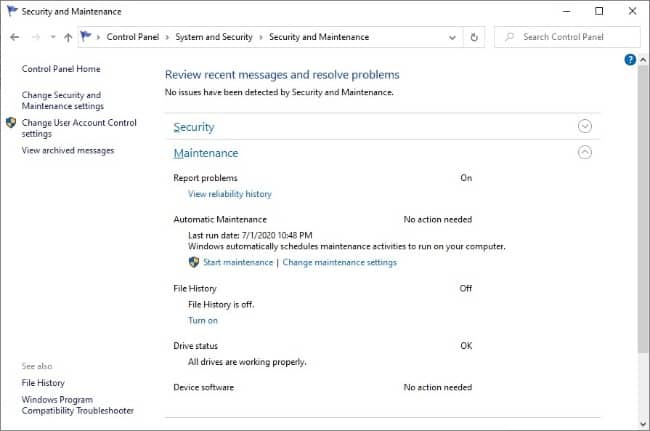
Windows has a built-in option to run scheduled maintenance on a daily basis, when the computer is not in use. This maintenance includes tasks like software updates, security scanning and system diagnostics.
In order to verify whether this type of maintenance is turned on, go to Control Panel > System and Security > Security and Maintenance > Maintenance.
In Change Maintenance settings you can configure the time when maintenance tasks run.
Check Windows files
If you start experiencing problems like some features not working as expected, issues with booting the operating system, or random problems – then there is a chance that some system files got corrupted or are missing.
To verify if this is happening, you should use the System File Checker (SFC) tool, which is a Windows 10 built-in tool.
This is a command line tool which scans the OS integrity and replaces the corrupted or missing Windows files, if necessary.
You can read a little more about the SFC tool and how to use it.
Click Start, and type cmd. Then right-click on it and choose Run as Administrator.
In the command line, type sfc /scannow.
Backup Your Data
We don’t understand the importance of regularly backing up our work until things go wrong and we suddenly lose everything that we have been collecting or have worked on for years: our pictures, working documents, projects, etc. Think about this once again. It is an emotional loss.
Although there are specialized applications for data restore, there are no guarantees for this process. Some files could be irreversibly lost.
Another thing is if you do not use your data frequently you should not keep it on the hard drive, because of two reasons: first, it takes space unnecessary and secondly, it could slow down the way data is manipulated on the hard drive, which will further slow down your computer.
There are 3 major ways how to backup your data
- Backup your data to cloud storage: With the emerging free cloud storage solutions, the process of backing up your data can go very smoothly. Great examples for this are Dropbox, Google Drive, OneDrive.
All you need to do is to install a client of your choice, then configure which Windows folders should be synced online and you are done. You will always have a copy of your important files secured in cloud storage.
- Backup data to an external hard drive or USB memory stick. Although this is an “old school” method, it works and it presumes copying manually all your important files to the external hard drive. Starting from Windows 10, there is a native support to backup your PC with file history.
- Backup data using backup software: there are various third-party software solutions that can do this for you. A solid backup software can usually do 3 types of backups:
- System backup
- File backup
- Partition/Disk backup
A great example of such a backup software solution is EaseUs Backup.
Third party utilities to Check the hard drive
Besides the basic tools for checking the HDD, you can utilize some third-party software tools to check the HDD health status. These HDD test tools will give better insights, including the S.M.A.R.T. attributes.
A couple of useful HDD test tools are: CrystalDiskInfo, HDDScan and Hard Disk Sentinel
Hardware Maintenance Tasks
Hardware maintenance tasks constitute the second part of the computer maintenance checklist. There are couple of activities that we need to do in order to ensure that hardware and computer peripherals are in good working condition.
Vacuum the dust and clean the vents
Regardless you are using a standard desktop PC or a laptop, computers have vents and the first thing is to ensure those vents are not blocked by any means – physically or with dust.
If you block the vents and leave your computer without possibility to “breath”, the temperature inside will increase very soon and this will cause overheating which will further lead to your computer to slow down. The most affected parts here are the CPU, hard drive and graphic card as the most crucial components that are sensitive to temperature.
Pay special attention to the cooling fan usually located on the rear, because this fan is pulling the hot air from the computer tower to the outside.
Dust is the biggest enemy for electronic devices and you should ensure your computer has as little dust as possible.
Regularly clean the keyboard, mouse and your monitor
Keyboard, mouse and monitor are also exposed to dirt and dust.
Breadcrumbs in the keyboard, fingerprints on the LCD display are some of the consequences of bad working habits.
Clean your monitor with a microfiber cloth and for stains use a special screen cleaning liquid. These two are usually sold as Screen Cleaning Kit. You can check some options available on Amazon here.
The Screen Cleaning Kit is not only to be used for your computer monitor, but you can also use this cleaner for the mouse and other electronic appliances such as TVs, tablet, kindle, etc.
For keyboard cleaning there are multiple approaches. Most of the time the only thing you will need is compressed air duster and dampened microfiber cloth.
Use the microfiber cloth dampened in isopropyl alcohol to scrub the keyboard and air duster to blow the debris underneath the keys. As for the air duster, you may find some affordable options on Amazon here.
In some cases cleaning the keyboard could be done with a special keyboard cleaning gel, dust vacuum or cotton swabs dampened in isopropyl alcohol. Any combination could work.
IT Departments that take care of a bigger number of computers can replace the compressed air dusters with electric duster driers. You may consider some options available on Amazon.
Free Tools to Monitor the Hardware
For more detailed hardware monitoring there are tools that can give you better insights about the health status. These tools know how to read the data from the system’s health sensors and display the information in a humanly readable way.
Of course, there are free tools that could help you with this activity, such as: Open Hardware Monitor, HWMonitor, etc. but also there are paid solutions such as AIDA64.